

![How to Translate DITA Projects [Step-by-Step Guide]](https://ivannovation.com/wp-content/uploads/2020/10/DITAXMLKeyboardFeatured.jpg)
DITA XML is a powerful tool for reducing the workload of authoring and managing content. Not only does it help companies save money with authoring and managing content, it also helps them save money when translating that content. Here’s our guide on how to translate DITA projects.
What’s DITA XML?
This article is part two of our DITA XML series. If you are new to DITA, check out part one of the series: What is DITA XML? | A Simple Introduction.
Article Summary
Corporate content developers can save a fortune with DITA XML technology with translation best practices. Here’s how to localize DITA XML content in such a way as to save money and improve quality.
Table of Contents
How to Translate DITA Projects
We have good news and bad news. The good news is that DITA XML and modern translation practices are a match made in heaven. The bad news is that translation of DITA projects can get a little complicated.
But that’s why we’re here: to make DITA localization simple for you and your team.
DITA and Translation: A Match Made in Heaven
Why do we say DITA and modern translation practices are a great match?
The purpose of DITA is to eliminate minor variations of text across a corpus (a collection of content) when a single version of the text will work.
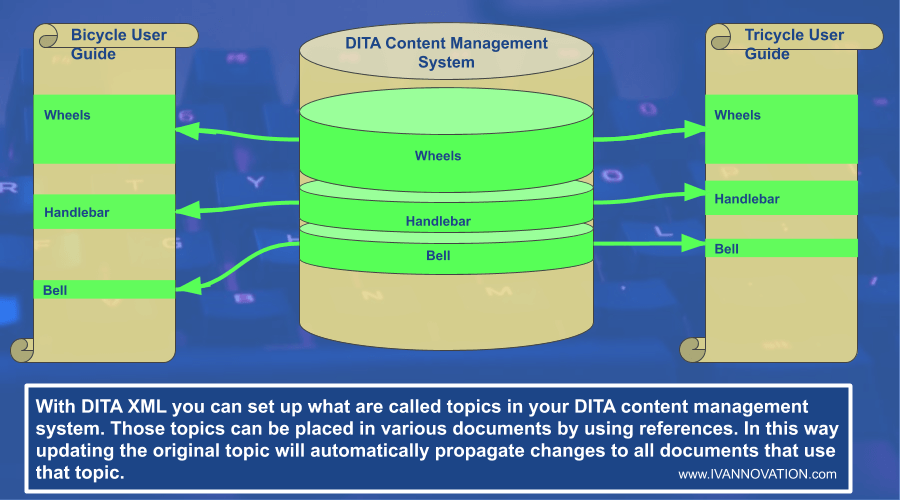
This matches with modern translation project management because with translation the goal is also to maximize the reuse of translated text and to eliminate inconsistencies between translations.
Consistency and reuse. That’s the name of the game.
So as text variations are eliminated through the use of DITA, so is the need to translate those variations.
But Things Can Get Complicated
So if the good news is that DITA and translation are a good match, what’s the bad news?
Well, as DITA involves text with tags, references, text insertions, etc., it becomes a little more complicated to translate than a legal document or brochure.
With a typical translation project, say a Microsoft Word document, you basically have to worry about only the language and maybe a little formatting—changing the font size, making sure the right words are bold, and so on.
But with a DITA translation project (or more accurately, DITA localization project), you have to worry about things like whether translators will corrupt the code and whether the design of the system itself will lead to language errors.
What’s the Difference Between Translation and Localization?
The terms are often used interchangeably, but they are actually different concepts. “Translation” refers to the linguistic activity of, well, translating one language into another. “Localization” typically refers to translating software and web content. It includes translating, but it also includes building the website or software so that the translated version will work properly for the foreign language users.
To learn how localization works see our article: How To Build A Multilingual Website.
You also have to worry about your DITA tools still being able to output the code into the target formats (such as HTML or PDF) in the target languages. That is, you have to be careful not to break anything while translating.
So in the following section we’ll explain what to watch out for when you prepare your DITA content for translation.
How to Prevent Errors From the Start
While you can rely on DITA writing to produce high-quality documents and massive content repositories by applying reusability principles, translation in DITA is much more complex than traditional publication workflows.
Especially if your documents are meant for the global market, you can’t expect to just translate DITA XML by replacing the original words and phrases with their translated counterparts.
That’s because different languages have different grammar rules.
- Words in some languages take an entirely different form depending on whether they are used as a subject or object.
- The words in some languages have grammatical gender references, which can affect other words surrounding them.
- Plural forms of verbs in some languages are used differently from the English language’s paradigms for zero, one, and more than one object.

Different languages have different grammar rules. That means that when writing DITA content in English, authors must take care not to do so in such a way that make it impossible to translate without errors.
With translation of DITA projects where text is inserted into other texts using references, these grammar differences can cause problems.
How Grammar Complicates DITA, an Example
Let’s explain the problem for DITA XML using an example with only English.
Let’s say you have the following sentence with a variable in it:
— John ate an [fruit].
And let’s say “[fruit]” can be substituted with various fruits. For example here’s the sentence with “orange.”
— John ate an orange.
Looks good, right? What if we replace another word for the term “orange”?
—John ate an apple.
Here, the replacement works just fine, as both the words begin with a vowel.
But what if we replace it with a word that starts with a consonant instead?
— John ate an mango.
That’s a big mistake because the English language uses the article “a” when the word starts with a consonant sound and the article “an” when it starts with a vowel sound.
It’s not about articles alone. Mere replacement of words in a sentence can cause many other types of problems.
Here’s another example:
— John ate an apple.
Let’s replace the term “apple” with its plural form “apples.”
— John ate an apples.
Do you get the idea now? English grammar rules can be broken pretty easily by carelessly inserting words using variables.
Now, when you have to think about the grammar rules of multiple languages, it gets even more complicated.
You may be setting up the system so it will follow the correct rules for writing in one language, but it doesn’t mean that it will work for other languages.
Therefore, the best time to think about how to translate DITA projects is when you are writing the original content in English.
Read More
Learn about the top software localization mistakes from our article: 5 Software Localization Mistakes That You Don’t Want To Make
The Bottom line:
The fact is, in order to avoid extra work later, DITA localization should be part of the project planning from the beginning. Effective design of DITA documents will affect the quality and the cost of translations for your organization later.
Therefore, using references to substitute single words within sentences may not be a good idea when setting up DITA XML documents that will be translated into another language.
After all, DITA is all about writing once and reusing multiple times. If you can’t save on the cost of translations with the reuse mechanism, you are failing to fully take advantage of the power of DITA.
A DITA localization company like IVANNOVATION can help you weed out this type of issue from your content so that your localized DITA output will be clear of such errors.
Don’t Make all the Mistakes! Take a Guide!
Don’t make all the common mistakes of DITA localization that can set you back and cost you money. Tell us about your DITA XML localization project, and let’s make sure it is a complete success.
Start Your DITA Localization Project
Now that we have considered the issues in DITA XML that can lead to grammar problems in other languages, let’s walk through the steps of a DITA localization project.
Go to top
Plan Your Localization Workflow
Translating or localizing DITA content is more difficult than translating a Word document because of the technical knowledge involved in managing the project, so let’s go through the DITA localization process step-by-step.
Situation: As an example, let’s say that you are authoring your original DITA files in English and then will have them translated into French.
Step 1: Author Your Content in English
First create your content using DITA XML authoring tools, for example, Oxygen XML and Flare project on Madcap Flare.
Learn More
For more information on authoring DITA content, see the first article in this series: What Is DITA XML? | An Introduction
Many teams choose to create all their DITA topics in a single folder. They separate the topics by prefixing individual files with C, T, R, G, and M for creating Concept, Task, Reference, Glossary Entry, and DITAmaps respectively.
For example:
- C_dita_topic_types.concept.dita
- T_how_to_set_java_environment_variables.dita
- R_what_is_localization.dita
- G_meaning_of_terms_used.dita
- M_fundmentals_of_dita_translation.ditamap
While prefixing helps in small projects, it’s insufficient for managing big DITA projects or massive content repositories.
Therefore, in order to set up a translation-friendly DITA project, you need to follow best practices right from the beginning of organizing your DITA files so that the topics, maps, and resources will all be stored in appropriate locations where they can be found and modified easily.
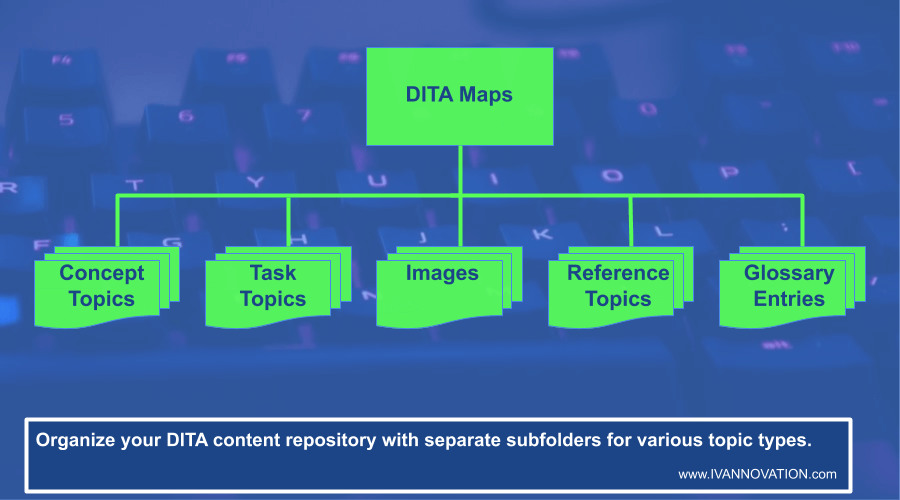
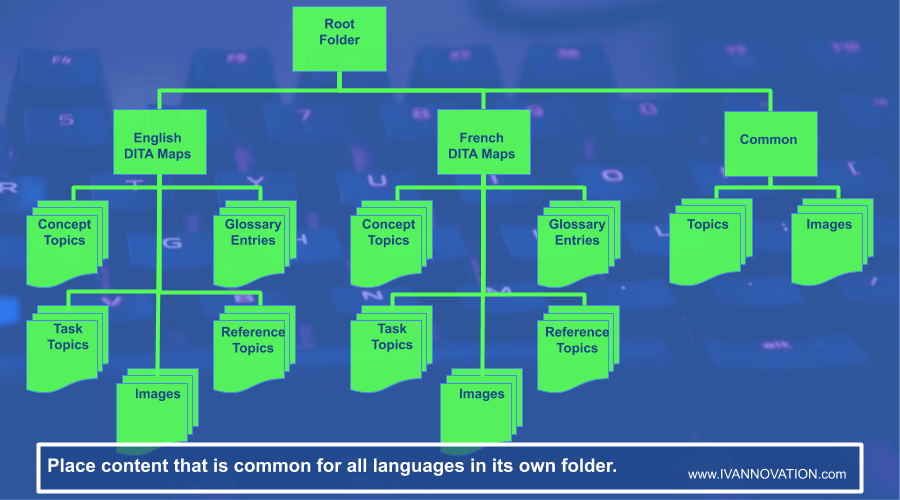
Store Files of Each Topic Type in Separate Folders
When you follow the topic folder structure, your DITA repository will look like this:
You will probably generate multiple DITA output formats to publish your DITA files—formats like PDF, HTML, etc. So you can create a separate folder for publications and place subfolders in it for each format. For example, it might look something like this:
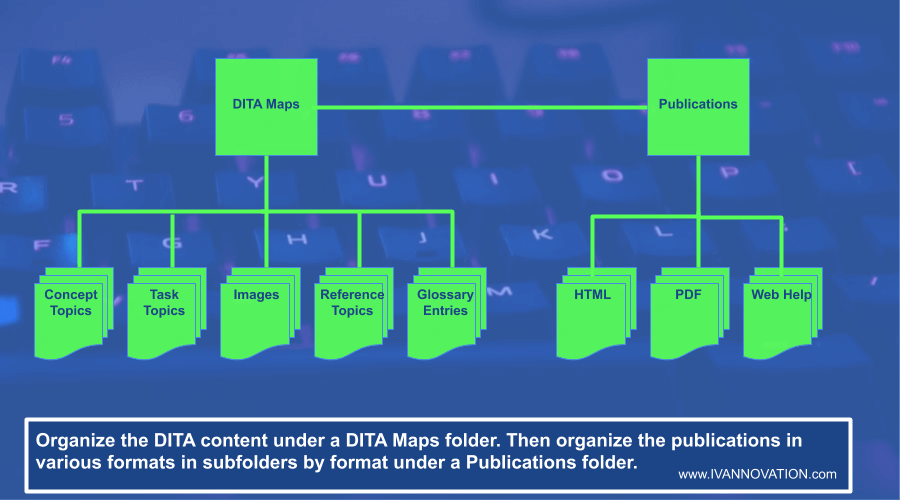
You now have a basic folder structure for the repository of your original DITA files (English in this case).
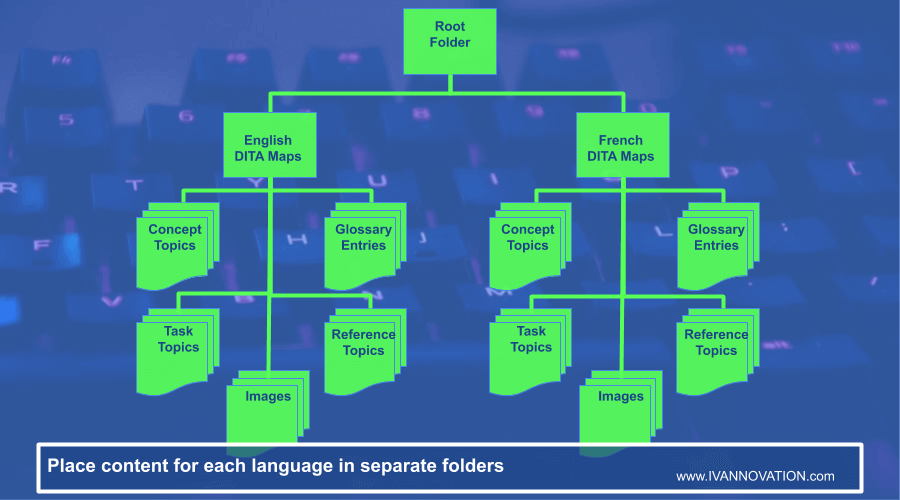
But what if you will be translating DITA files into other languages like French? If that’s the case, then you can place each language’s DITA files into their own subdirectory.
Create a Separate Folder for the Files and Images You Don’t Want to Translate
Often there will be images and other files that will be used for every language. They do not need to be translated.
You can create a separate folder to hold all those files and images so that you don’t create unnecessary duplicate files for every language you translate into.
Step 2: Send a Copy of Your Original DITA Files to Your Translator or Localization Service Provider
Once the English version of your content is ready, it’s time to send the files to your Translator or Language Service Provider (LSP).
You’ve probably figured out by now that you shouldn’t send the DITA output files, such as PDF or HTML, to the LSP.
Instead there are two options; you can send your LSP either the source code or XLIFF files. We’ll go over these two options in the next two sections.
Sending the source code
- Create your content in English, and mark all the elements, topics, and DITAmaps with the DITA XML attribute
xml:langto make them identifiable by the system as English. - Send a copy of your English files to your LSP.
- The LSP will translate the DITA XML files and send them back to you in the same folder structure.
- Put the translated content into your system
- The system will recognize the language of the elements, topics, and DITAmaps according to the DITA XML attribute xml:lang. For example, French would be:
xml:lang="fr-fr". - The system will use the translated content in order to output translated publications.
Beware that not every translator or LSP can understand complex DITA and XML files and produce translations without breaking the source code. When choosing an LSP, it is vital to determine whether it has experience with DITA localization.
Get a Free Quote to Translate DITA XML Content
IVANNOVATION has decades of experience localizing structured content.
Get a Free Quote

IVANNOVATION typically localizes DITA files directly, but some companies prefer to create XLIFF files to send back and forth between their translation providers.
Sending XLIFF files
Another method of localizing DITA is to send XLIFF files to the LSP.
What Does XLIFF Mean?
XLIFF stands for XML Localization Interchange File Format. Like DITA, it’s an open standard from OASIS. It is used to pass translation projects from one translation tool to another.
XLIFF files store translations in the source language and target language along with information about the translation such as:
- The name of the last user to update the translation unit
- The time of the last update to the translation unit
- And much more
Here’s a simple example of an XLIFF file:
<xliff xmlns="urn:oasis:names:tc:xliff:document:2.0" version="2.0" srcLang="en-US" trgLang="zho-CN">

   <file id="f1" original="Example.html">

      <skeleton href="Example.html.skl"/>

      <unit id="1">

         <segment>

            <source>Preview</source>

            <target>预览</target>

         </segment>

      </unit>

      <unit id="2">

         <segment>

            <source>Window</source>

            <target>窗口</target>

         </segment>

      </unit>

      <unit id="3">

         <segment>

            <source>Mouse</source>

            <target>鼠标</target>

         </segment>

      </unit>

   </file>

</xliff>
(Find more examples of DITA XML code like this on this page.)
Using XLIFF to translate DITA projects, you will get access to tons of rich elements and attributes that allow you to:
- Send files for translation without exposing the source code to corruption
- Store multiple variations of a translated text collected from the translation memory (TM)
- Handle version control
- Keep track of the translation workflow and its status
- Calculate word counts easily
Most Language Service Providers that offer DITA translation services can accept XLIFF files.
How to create an XLIFF file?
So if you want to send XLIFF files to your LSP, you will need to first convert your DITA content into XLIFF files. Here’s how:
- Create your DITA topics in English. Refine your topics and ensure that you are satisfied with the publications of your DITAmaps.
- Once you are sure that you have a perfect English version, use a translation tool (see the next section) that supports DITA to convert your DITAmaps and topics into XLIFF format. Such a tool can:
- Resolve reference attributes automatically, such as
conreforconkeyrefattributes. - Refer to the
translate=“yes”ortranslate=“no”attributes to pick elements and topics for translation. - Refer to
dir=“ltr”ordir=“rtl”attributes to identify the direction of text in your translated language (e.g. English is left-to-right while Hebrew is right-to-left).
- Resolve reference attributes automatically, such as
- Parse your DITAmap for all elements, topics, and references to prepare a unified XLIFF file package that you can send to your translation service provider.
Tip
You need to generate separate XLIFF files for every language you want to translate DITA XML into.
- The LSP translates the text in the XLIFF files.
- Once you receive the translated XLIFF files, import them into the folders specified for each language.
- Convert translated XLIFF files back into DITA XML.
Whether you choose to send source files or XLIFF files to your translation company depends on your preference. Talk with your LSP about which method would be best for you and for them.
IVANNOVATION typically takes DITA source files and then delivers translated files to its customers so that the customers don’t have to go through the process of converting to and from XLIFF on their own.
If you do want to convert DITA to XLIFF, here is a tool you can use.
DITA Localization Tool to Convert DITA to XLIFF
With Fluenta DITA Translation Manager, you can convert DITA to XLIFF in order to send to your LSP, and you can convert XLIFF to DITA when you receive the translated XLIFF file back.
To get started you simply need to:
- Choose the location of your DITAmap,
- Name the project, and
- Choose languages to translate into.
Then Fluenta can generate optimized XLIFF files from your original folder structure.
Then Fluenta can convert your translated XLIFF files and put DITA content back into the original folder structure for each language.
Other tools exist which are specifically related to translation of DITA content such as Madcap Lingo if you work on Madcap Flare projects.
IVANNOVATION can work directly with DITA files and return translated DITA files to its customers. But IVANNOVATION can also deliver XLIFF files and translation memories as requested by the customer.
If you would like to discuss how to set up an optimum DITA localization workflow, please contact us.
Let’s Talk DITA Localization!
We’ll get you on the fast track to translate DITA projects. Find out why one localization customer said the project “was almost too easy!”
Let's Talk About Your DITA
Follow Best practices for DITA Localization
Although we have gone through many best practices in DITA translation already in this guide, here’s a checklist of DITA localization best practices for quick reference:
Specify the language in your DITA files and maps
The DITA publishing system supports an array of languages. It’s always a best practice to identify the language of your DITA elements, topics, or DITAmaps as a whole, even if you are not planning for translation anytime soon.
Use the xml:lang attribute to indicate the language of your content. So that means if you are writing DITA content in American English, specify the language using xml:lang=“en-us”.
That way if you want to translate your content into European French, the language attribute will already be in your code; you simply need to set the attribute value to French:
<map xml:lang="fr-fr">

   <title>Utilisation de la gestion des contrats</title>

</map>
Please note that languages can have different regional variations. In this case, you need to specify the region. For example, xml:lang= “en-us” is for English (US), and xml:lang= “en-gb” is for English (UK).
Identify Content Not to Be Translated
DITA allows you to specifically communicate to translators which parts of a DITA file you do not want translated.
For example, you may want to mark <codeblock> and <codeph> elements as nontranslatable.
To do this you can use the translate attribute, and set the attribute value as “no” (e.g. translate=“no”). That will let the translators and translation management tools know which DITA elements to exclude from translation.
Create Localization-Friendly Content
The term “localization-friendly” is purely subjective. However, there are certain standards which when used, optimize your content for translation and reuse. Following these standards can reduce the cost of translation.
For example, using Controlled Natural Language in your documents helps you to reduce ambiguity and complexity. It makes your document highly readable, and thus will help prevent translators from having misunderstandings.
When composing technical content, write in Controlled Natural Language in order to make the content understandable and to prevent translation errors.
For best translation results:
- Keep sentences short and clear.
- Avoid the use of pronouns since the meaning of the pronouns can be ambiguous. For example, in the sentence “Bob gave the paper to Sam, and then he got in the car,” who is “he”?
- Avoid the use of regional slang.
- Use only words in the dictionary.
- Avoid using the passive voice.
Handle DITA conkeyref With Care
The biggest advantage of DITA is re-usability using reference attributes such as DITA conref (content referencing) and conrefkey.
When conref is used in DITA it acts as a placeholder for the element that it references. When the DITA content is published, the conref elements will be replaced by the content that they reference. This way this content can be reused throughout the documentation.
However, unique problems can arise with conref during localization.The fragment of content in translated DITA documentation doesn’t always fit back into the context of the translated content block that referenced it. It may have a series of inconsistencies such as grammatical errors, directional errors, and cultural errors.
Let’s take a simple example of localizing DITA content from Chinese to English. “她” means “she” but it also means “her.” The same word in Chinese refers to two words in English. So if the DITA authors use a single reference for every instance of “她” in the documentation, then many grammatical errors will emerge. For example “She asked Bob” is correct, but “Bob asked she” is wrong.
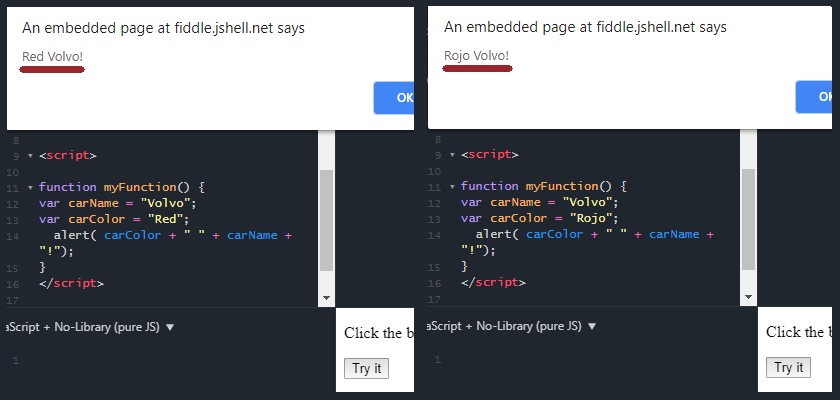
This image (of JavaScript code) illustrates how putting sentences together with code can result in grammar errors in other languages. The code outputs “Rojo Volvo!” However, Spanish places the adjective after the word it modifies, not before.
The best way to avoid errors with DITA conrefkey or conref is by avoiding complex usage and maintaining a few practices, as given below:
- Avoid using
conreffor incomplete phrases. Every sentence should be grammatically complete. - Avoid using
conreffor common nouns. - While using proper nouns, keep the proper noun in the nominative case and use it as the subject of the sentence.
Handle Language Direction
Not all languages use left-to-right (LTR) script like English. Many languages use right-to-left (RTL) scripts such as Arabic, Hebrew, and Urdu, etc. It’s a best practice to set the dir attribute for the publication system to optimize the translations.
Remember that some languages like Arabic are read from right-to-left rather than left-to-right.
For example, the following tag indicates that the language is Egyptian Arabic and that the language is right-to-left:<xml:lang =“ar-eg” dir =“rtl”>
Create a Standard Folder Structure
Instead of putting all your files and maps in a single folder, use a folder tree as explained earlier in the article to store different types of files and resources. However, make sure to keep your DITAmaps at the same level as where you have kept your topics and images, or put DITAmaps a level above them. Some DITA publication tools can’t resolve if images are kept at a level above the DITAmap.
Like the Article?
Click here to share on Twitter>>
Tweet
Click here to follow IVANNOVATION on Twitter and be first to learn about our new content>> Follow @ivannovation
Handle <index-sort-as> Element and <sort-as> Element for Some Languages Manually
Sorting items in a list in English seems easy enough; just sort by alphabetical order. But some languages such as Japanese and Chinese cannot necessarily be sorted that way.
That’s because some characters have different pronunciations depending on the meaning.
So in order to ensure that lists get sorted correctly, you may need to have your developers add an <index-sort-as> element in every <indexterm> element.
Follow Proper Process While Working With LSPs
Be sure to work with an LSP or translation company that is well-versed with XML and DITA documentation. It should be aware of the Document Development Life Cycle (DDLC). Work only with LSPs that know about the complications and pitfalls of translating DITA XML content and are willing to work with you to produce a final product that is not only linguistically correct but also technically correct.
Apart from this, there should be a proper workflow of how you are going to send your content and how your LSP is going to deliver the translated content back to you.
You must keep the following pointers in mind while collaborating with any translator or LSP:
- Let your translation company know about the DITA version and DITA tools you are using.
- Before sending files for translation, make sure you have fully optimized and fixed all the errors, validations, extra spaces,
conrefattributes,conkeyrefattribute, and DITA folder structure. - When sending your files for translation, also send a PDF published version of your English content for reference. That way, translators can understand the context of the content.
- Clarify with your LSP regarding the format and standard of the file they will send back to you. It must not have any broken links, code errors, and must retain the original mark-up of the original document.
- Clarify beforehand if you are required to put the
xml:langattribute to specify the language in your DITA files of the translated copy, or they will do it. - Properly mark the elements and topics with the translation attribute set to “no” if you don’t want them to be translated. You can also create a list of such non-translatable elements.
Conclusion
IVANNOVATION has had a long history of translating or localizing DITA XML content using modern translation best practices. If you want to get on the road to effective translation project management or if you need to localize your DITA content, contact us, and let’s take your content to a new level.
Want to Translate DITA Content?
Talk with IVANNOVATION’s DITA XML localization specialists to ensure a successful translation.
Let's Talk
Vinay Kumar, Software Engineer and Technical Writer by profession. He has 5+ years of experience in DITA-XML, Web Development, Digital Marketing, Blogging, and Google SEO. Loves reading thrillers and playing video games in his leisure time.
Darren Jansen, business development and content manager for IVANNOVATION, has a lifetime love for tech and languages. At IVANNOVATION he helps software developers get professional localization for their apps, software, and websites. On his time away from the office, he can be found hiking the Carolina wilderness or reading Chinese literature.
This article was written by Vinay Kumar and Darren Jansen
Get free translation tips straight to your inbox!
- Get tips on how to translate your structured content!
- Get actionable advice to help you succeed with international business.
- Be the first to access free language and management tools.
